Group 78 Bulletin Board
12 threads - 43 total comments
This page is dedicated to discussions about our theme (General Photography) that are outside the scope of our monthly images.
Thread Title: Getting started with PSA Competitions
I recommend you start competing with PSA by entering their FREE Facebook competition every day. No rules, no sizing, except all parts of the image must be yours (read rules pinned at top)
https://www.facebook.com/groups/359957924457298
It's easy to enter a pic every day (keep track of which ones you enter). You will see a lot of great images and see what the judges choose. There is a different judge every day, one from the USA, one from India, one from Europe, one from the Middle East, and so on, so that it minimizes the judge's preferences.
To get an idea of what is involved in competing, you'll find the PSA webinar library has 2 videos that are helpful.
Go to: https://psa-photo.org/page/webinars
You must request to see webinars, there is a button at the top.
Then scroll down to "Downloadable Webinar on PSA Activities"
Then watch "How to Enter PSA and FIAP exhibitions" by John Andrew Hughes
There is a lot there, you might want to watch a couple of times.
Then there is a video on how to apply for distinctions--
"Achieving Photographic Distinctions from PSA" by Roy Killen
I hope this helps to get you started. I am happy to help if you get stuck.
Good luck!
Brenda Posted: 12/17/2023 09:49:02
Thread Title: Photographic Society of America PTD Competition Corner
Hello, everyone! After reading Nadiaââ¬â¢s entry in the PSA supplemental Travel Journal, I thought it was important enough to re-post in the Digital Dialogue group pages. Here, we are reminded that ââ¬Å“changing realityâ⬠is not allowed in PSA Travel Photography competition. In addition, I also want to stress the need to appropriately categorize oneââ¬â¢s work if using ââ¬Å“compositeâ⬠techniques (including sky replacement) by tagging the work as a Hybrid Image, primarily when competing outside the Travel Photography category.
Below is a shortened version of Nadia Filiaggiââ¬â¢s original post in this months Travel Photography Journal.
Photography Travel is a documentary medium, and our images must reflect what was seen when we pressed the shutter. Removing, adding to, moving, or changing any part of an image except for cropping and straightening is not allowed. This goes for adding a different sky even if you are the author of the sky that is being replaced. (Please see the images below for reference).
(Note that using an element on an image that is not your own work cannot be entered into any section of a PSA recognized Exhibitions and is in violation of the PSA Ethics Policy).
Here are some examples showing the sky replacements selected from the Photoshop sky replacement facility: Here, it is evident how each Sky Replacement selection changes the mood and overall aesthetic of the original registered event below. Nonetheless, both examples are not authentic and thus ineligible to be used in PSA image competition.
The ââ¬Ë2023 Photo Travel Guide for Judges and Chairsââ¬â¢ is available for download on the Photo Travelââ¬â¢s webpage: https://psa-photo.org/page/photo-travel
The Photo Travel Division has also set up a Gallery of staged/set-up images which our members can peruse: https://psa-photo.org/page/mo-ptd-staged-images
We have also produced new educational material that relates to the 2023 Guide: https://psa-photo.org/page/mo-ptd-resources
If you are uncertain if your image adheres to the Photo Travel Definition, please make use of the free Photo Travel Evaluation Service which members can access after login: https://psa-photo.org/page/mo-individual-image-evaluation
We look forward to hearing from you and directing your questions to the appropriate PSA administrator.
Originally posted by:
Nadia Filiaggi MPSA EFIAP
Email: ptd-esd@psa-photo.org
Best regards,
Lance A. Lewin (DD83 and DD87 Admin)
PSA B&W Photography Mentor
PSA South Atlantic Area Membership Director
Email: lance.visualizingart@gmail.com
Posted: 03/28/2023 20:52:35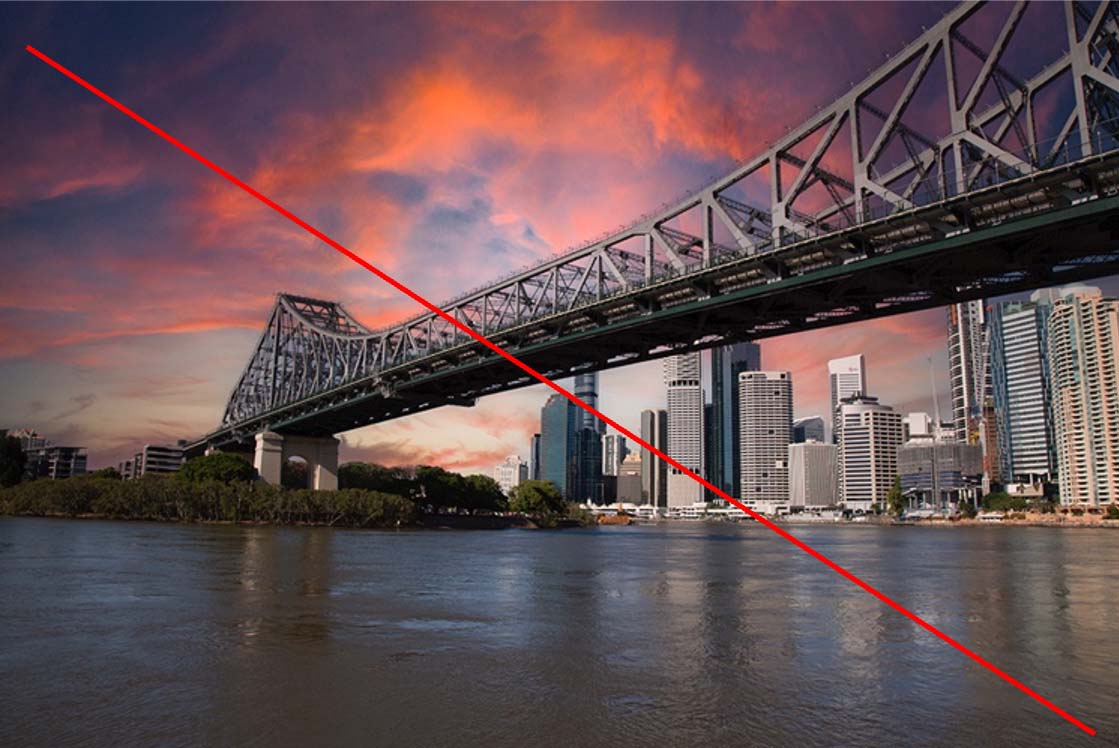
Posted: 03/28/2023 20:52:48
ORIGINAL IMAGE REGISTERED BY THE CAMERA: acceptable Posted: 03/28/2023 20:53:24
Thread Title: Fine Art Photography Article: Compositional Structure
PSA Fine Art Photography Article: Compositional Structure
Hello, everyone! Hope you take the time to read my article in
The March issue of the PSA Journal, which can be found on the
PSA website if you do not currently receive the hard-copy of the
Journal. I very much look forward to your comments.
You can also Follow the Link below. Thank you.
https://psa-photo.org/resource/resmgr/pdf/journal_/2023/2023-03-psa-journal.pdf
Lance A. Lewin
PSA B&W Photography Mentor
PSA South Atlantic Area Membership Director
Contact: lance.visualizingart@gmail.com
Posted: 03/19/2023 16:36:31
Thanks so much, Lance! Posted: 03/19/2023 16:41:57
My pleasure ... I hope you enjoy the read. : ) Posted: 03/23/2023 05:19:15
Thread Title: Schleif's Workflow for Focus Stacking
Camera, lens, tripod
Canon R5 with Canon RF 100mm f/2.8 lens. Tripod.
Taking the shot:
The camera is set for focus stacking, 350 shots and f/2.8 using the camera's default setting for focus increment. Autofocus is on, stabilization is off. 2 second delay after pressing shutter release until shooting will begin. Half press the shutter release and hold. The camera focusses on the nearest object within the chosen focus area. While the release is still half pressed, manually adjust the focus of the lens so that focus is in front of all parts of the subject. Note that the camera can display the focus distance while this is being done. Fully depress and release the shutter button, and after two seconds the shooting begins. Carefully watch the display, and as soon as the most distant part of the subject has come into focus and then starts to become blurred, depress and release the shutter release to stop the shooting.
Processing
I have experimented with various work flows, and I find that the following gives me the sharpest images with the fewest artifacts to be corrected manually.
Convert the raw images to tif using the Canon raw processor in DPP4.
Settings
Digital lens optimizer, 100% (This corrects chromatic aberration, distortion, and vignetting.)
Adjust luminosity so that brightest pixels of the image are somewhat shy of being blown and the darkest pixels of the image are close to full black
Minimal sharpening
No increase in clarity
Examine the tif images and either delete or do not use those at the beginning and at the end where the subject is not in focus.
Generating the composite focus stack
Open the tif images in Helicon focus, process using algorithm C with a smoothing setting of 2.
Process the stacked composite with an image editing program, which in my case is Picture Window 8, but most people will be using Photoshop. Posted: 02/22/2023 09:19:24
Thanks so much, Robert! Totally ignorant of this, so if you can guide me...you pick out your subject area you want in focus? For example, the bottom of the flower to the top of the flower, even though are different distances? Or does automatic focus stacking focus everywhere in an image and you pull out the ones that focused in areas you don't want in focus? In a landscape, you want beginning to end to be in focus (close to very far). Or in Milky Way, all parts in focus. I have just single shot Milky Way images, but I understand Focus stacking is a better way to go.
You find Helicon better than what PS or LR offers (perhaps they don't offer anything?) Thanks in advance!
Posted: 02/22/2023 11:25:00
You find Helicon better than what PS or LR offers (perhaps they don't offer anything?) Thanks in advance!
Posted: 02/22/2023 11:25:00
Brenda,
I just saw in the bulletin board your questions on focus stacking. Focus stacking allows you to generate a composite image where parts of the image at different distances from the camera can all be in focus. Usually I allow the camera to start shooting when it is focussing well in front of my subject, and to continue shooting until its sharp focus area is well beyond the most distant part of what I imagine that I will want to be in sharp. Then, in post, for the composite, which is made in Helicon, I use just those shots that have my desired subject in focus. Helicon then puts these together.
With respect to software, Photoshop is not particularly strong on focus stacking. In general, Helicon is good.
Zerene is supposed to be good as well.
Focus stacking can be used in landscape photography if you want objects both close by and far away to be in focus. In this case, instead of dozens shots needed, only a handful will be required. The R5 will make the necessary adjustments. If you focus on something 30 feet away, it takes just a few shots to be focussing at infinity.
There would be no point in using focus stacking for shooting the Milky Way unless you were also including something in the foreground that you wanted to be in focus as well. Posted: 03/20/2023 08:52:15
Thread Title: Post process info that Sunil offered
Here's a PDF on the technique Sunil uses in Lightroom Posted: 10/02/2022 10:08:56
Thread Title: Final Results of 2020
I've just had the ribbons for the PSA Individual Portrait Division Competition round 1, one Merit and one Honorable Mention. Now for round 2.
>3 other medals this year in PSA recognised competitions, 2 Bronze medals and a Judges Choice, plus assorted ribbons, so what will 2021 offer?
Posted: 12/30/2020 11:47:22
>3 other medals this year in PSA recognised competitions, 2 Bronze medals and a Judges Choice, plus assorted ribbons, so what will 2021 offer?
Posted: 12/30/2020 11:47:22
That's fantastic, Terry! I have only won one Honorable Mention--I am so proud of you!!! Congrats! Posted: 12/30/2020 19:06:43
Congratulations... Posted: 12/30/2020 19:43:10
Can you post some of your winning pix here? Posted: 12/30/2020 19:45:12
Congrats Terry! I would like to see your images as well if you can share a link.
Best wishes to all in 2021 ! Posted: 01/01/2021 10:14:24
Best wishes to all in 2021 ! Posted: 01/01/2021 10:14:24
I love them, Jason! But what about your powder photo? That was sooo cool! Posted: 01/01/2021 20:37:08
First Portrait, Carla Enigmatic (HM)
Posted: 01/01/2021 15:06:30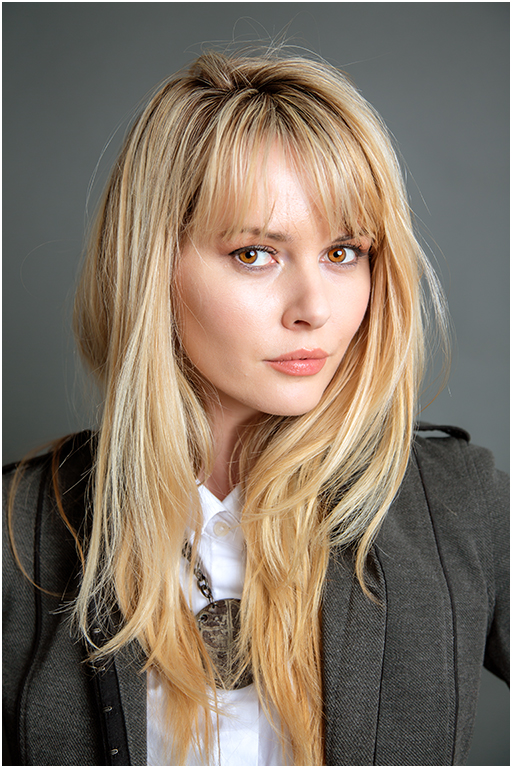
Posted: 01/01/2021 15:06:30
2nd Portrait, Lenah (merit)
Posted: 01/01/2021 15:07:07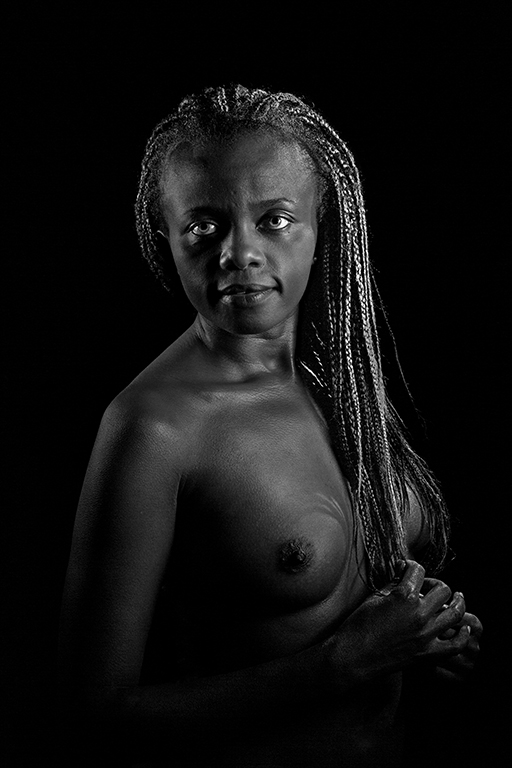
Posted: 01/01/2021 15:07:07
Judges Choice Medal, One Good Tyre
Posted: 01/01/2021 15:09:14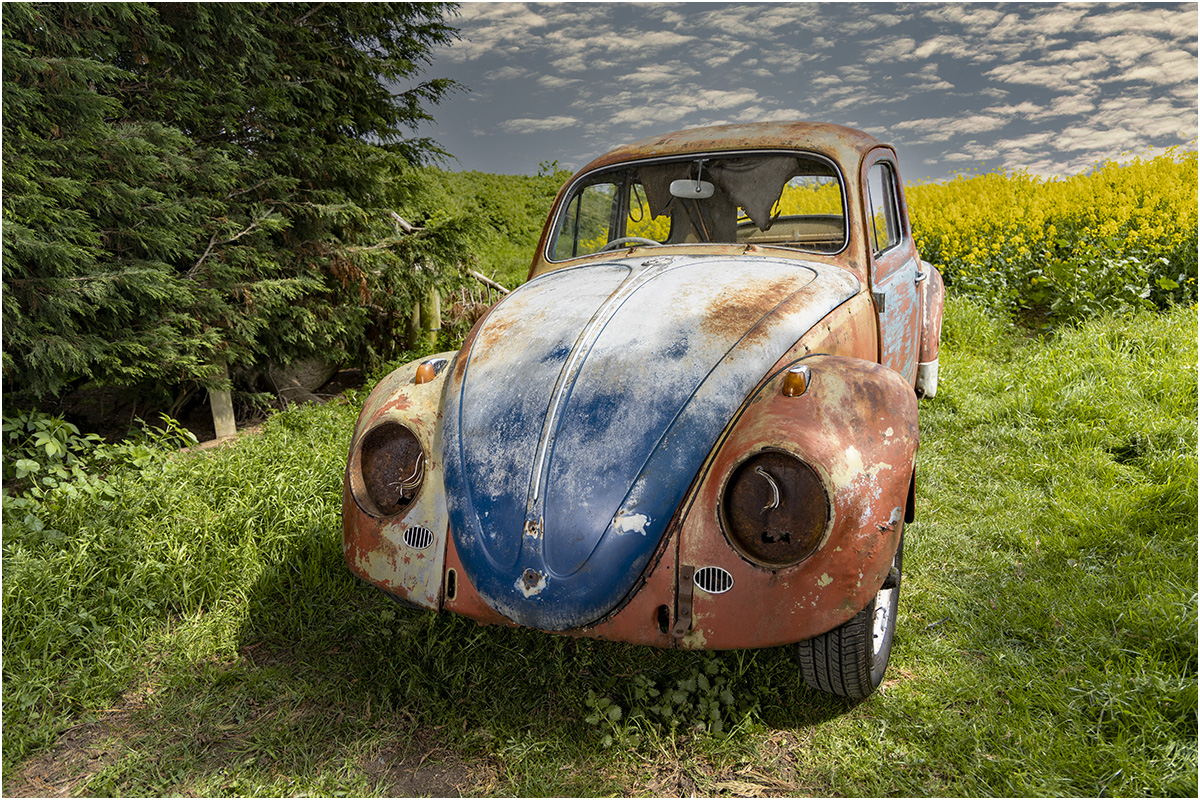
Posted: 01/01/2021 15:09:14
Nice Terry, thanks for showing us these. Great images and especially beautiful tones in your merit portrait. Posted: 01/01/2021 18:26:50
Thread Title: Jim Hagan’s 09/20 Image
From Jim Hagan's September 2020 entry--
Jason Kravitz--This gives you an idea of the gray area that I used to paint in the dark areas.
Jim Hagan --Many thanks for your revision and for explaining your 50% gray layer. I do use dodge and burning but will have to try your technique. Posted: 09/27/2020 19:06:02
Jason Kravitz--This gives you an idea of the gray area that I used to paint in the dark areas.
Jim Hagan --Many thanks for your revision and for explaining your 50% gray layer. I do use dodge and burning but will have to try your technique. Posted: 09/27/2020 19:06:02
Thread Title: Underwater Photography Group
There has been some interest in Digital Dialogue to start an Underwater Photography group. If you have an interest in joining an underwater photography digital dialogue group, let me know, and I will pass it on to the organizers.
Also, I just learned that if you are in 2 or more Digital Dialogue groups, you are not allowed to enter the same pic in multiple groups. I actually have done this several times, as it gives me even more ideas. But, obviously, won't do that any longer. Just passing that on, if any of you are in multiple Digital Dialogue groups. Posted: 08/23/2020 12:42:58
Also, I just learned that if you are in 2 or more Digital Dialogue groups, you are not allowed to enter the same pic in multiple groups. I actually have done this several times, as it gives me even more ideas. But, obviously, won't do that any longer. Just passing that on, if any of you are in multiple Digital Dialogue groups. Posted: 08/23/2020 12:42:58
Thread Title: PS Elements Workflow
Here are the basic steps Stephen Levitas (Group 32). used in PS Elements.
1. Open a new blank PS document, with lots of space to receive two copies of your image. Later you can crop down to just the final image.
2. Crop your original image (if needed, as in this case) to just the portion of the image you want, and copy it into layer 1 of the new document.
3. Go back to the Step 2 image, flip it horizontally, and copy that to layer 2 of the new document.
4. Move the images to touch, crop the composite to get rid of excess empty space, and save as a JPEG if you want.
Lots more creativity is possible with copying, transforming, and pasting into a new document, and we have seen some fantastic stuff (much more than this basic technique) throughout the Digital Dialogues over the months and years. Some folks are fantastic with their imaginative transformations. Posted: 08/20/2020 15:47:52
Jim Hagen's photo, and then the "double" is Stephen's version. His directions are above. Posted: 08/20/2020 15:51:49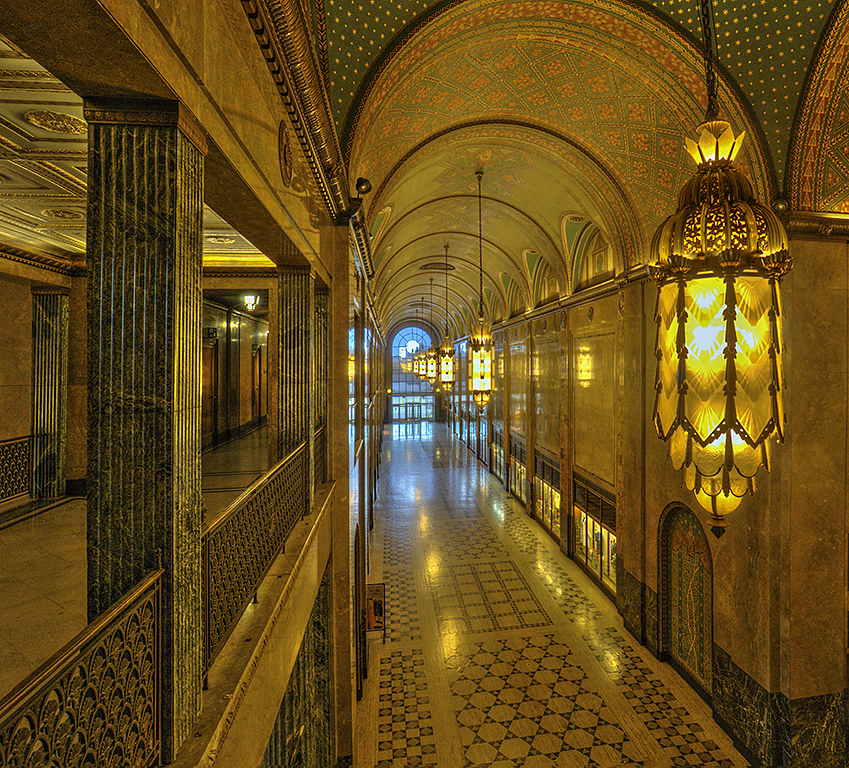
Posted: 08/20/2020 15:52:11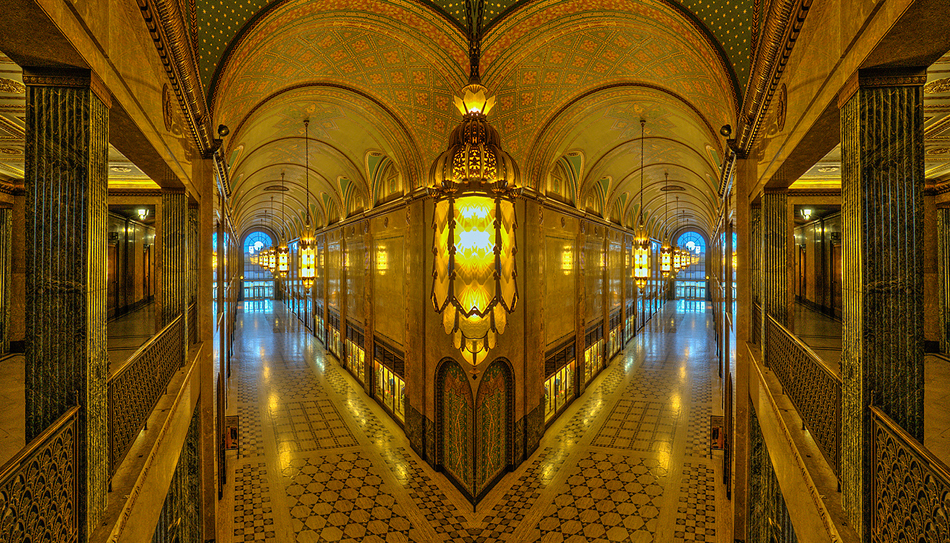
This looks great and a great technique. Thanks Brenda (and Stephen)!
Funny I've been using this technique with the photos posted on my blog all this week. We must be in tune.
https://jason.aminus3.com/image/2020-08-19.html
https://jason.aminus3.com/image/2020-08-20.html
https://jason.aminus3.com/image/2020-08-21.html Posted: 08/21/2020 09:27:56
Funny I've been using this technique with the photos posted on my blog all this week. We must be in tune.
https://jason.aminus3.com/image/2020-08-19.html
https://jason.aminus3.com/image/2020-08-20.html
https://jason.aminus3.com/image/2020-08-21.html Posted: 08/21/2020 09:27:56
Thread Title: Showcased Image
One of my images, "Decisive Moment", has been posted to the Digital Dialog Member's Showcase home page for this month, go Group 78 :)
http://psadigital.org/
Posted: 08/16/2020 05:25:29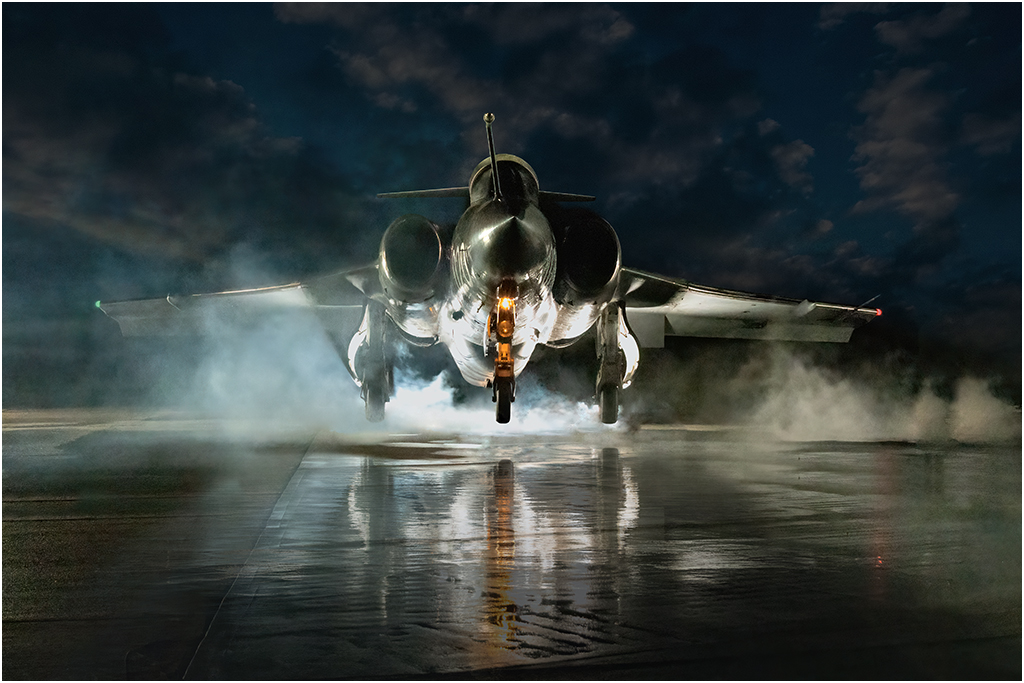
http://psadigital.org/
Posted: 08/16/2020 05:25:29
Excellent.
Very well captured and processed.
Posted: 08/16/2020 10:18:40
Very well captured and processed.
Posted: 08/16/2020 10:18:40
Incredible! Great choice on their part! Thanks for letting us know! Posted: 08/16/2020 12:02:49
Congrats Terry. This is a great photo.
What type of plane is that? Posted: 08/16/2020 13:40:55
What type of plane is that? Posted: 08/16/2020 13:40:55
Buccaneers, unfortunately no longer in service.
Posted: 08/16/2020 14:42:43
Posted: 08/16/2020 14:42:43
Impressive shot Terry! You must have nerves of steel! Posted: 08/16/2020 20:06:27
Thanks Helen, I started out telling people I was on a carrier in a 'foxhole' to get the shot, but then they caught on that none of these were in service so it must be Photoshopped ... oh well, the illusion was fun while it lasted.
Posted: 08/17/2020 07:35:40
Posted: 08/17/2020 07:35:40
Terry, can you discuss how you created the shot? Or maybe post it next month so we can all learn how to create this?
Posted: 08/17/2020 08:59:36
Posted: 08/17/2020 08:59:36
Thread Title: Moon Photography Tips
Brenda was asking for some moon photography tips.
I usually try to get out every full moon, especially in the summer when it stays lighter out and you can get more photo opps with the moon interacting with foreground elements without it being too dark.
Most of what I've learned has been from photographer Don Smith who shared some of his techniques in an article posted on Aminus3 a while back.
You can see it here : https://www.aminus3.com/threads/amazing-moon-photography/
Posted: 08/10/2020 17:33:06
So you go out every Full Moon! sounds like there's another story here ... lol
Posted: 08/11/2020 04:32:47
Posted: 08/11/2020 04:32:47
Lycanthropy is a hell of a drug :) Posted: 08/11/2020 09:07:03
Oh, my gosh, what killer moon shots! Interesting, he didn't have many technical tips, I thought I'd be reading a geek page. Awesome! Thanks for posting. I have asked the webmaster for a Tips Button next to our Bulletin Board, and we can store your wonderful Animus tips, as well as anyone else's links there for long term. Posted: 08/12/2020 20:17:46
Thanks Brenda for adding the links. That is great! Posted: 08/17/2020 09:50:38
Thread Title: Call For Topics
I'm testing out our bulletin board. This is where we can discuss camera gear, a specific technique, etc. I'm hedging a bit and putting my latest version of my July entry, as I didn't get it posted before the discussion closed on it. I started from scratch and went a whole different direction with tools and processing. I wanted to get the blue HDR halo off the yellow rope that Jason had pointed out.
You'll find our bulletin board button in white right above "PSA Digital Dialogue". Anyone have a topic? Posted: 08/02/2020 17:18:09
You'll find our bulletin board button in white right above "PSA Digital Dialogue". Anyone have a topic? Posted: 08/02/2020 17:18:09
This version is much better, removing blue halo makes lots of difference and overall image is now more balanced. Posted: 08/02/2020 19:51:47
Thanks, Sunil! I appreciate your feedback. Such a simple pic, but I learned a lot!
Posted: 08/02/2020 20:09:15
Posted: 08/02/2020 20:09:15